Cart (0)
Close

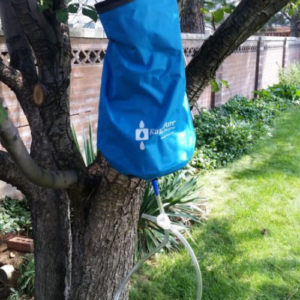
Trail Blazer 5.0 L/M 6.5″ Drip Filtration Kit
$72.48
2 in stock
-
Guarantee safe checkout

Share :
Description
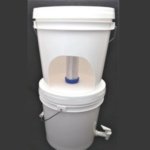
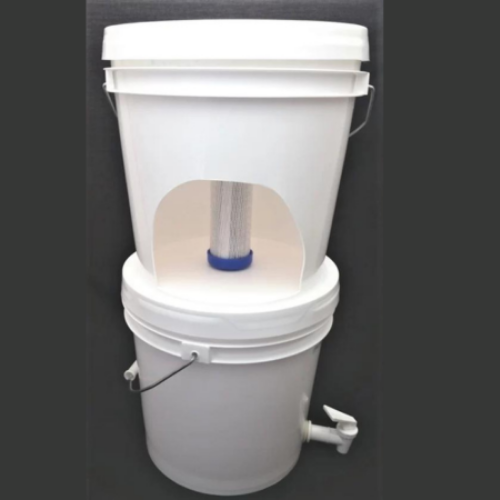
Trail Blazer 5.0 L/M 6.5″ Water Filtration Kit
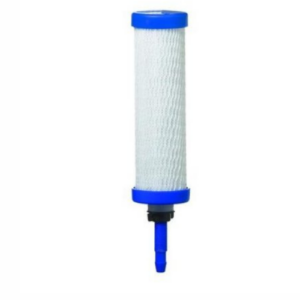
1) Trail Blazer Ultralight 5.0 L/M Liter Minute Filter, 6.5″ in length (300-6.5-17)
2) 2-gallon pre-drilled buckets with tear-off lids
1) 3/4” Spigot
The best containment device for this water filter kit is a five-gallon bucket with a screw-on gamma lid. A five-gallon pail holds all the above components making it easy to store, carry, and use.
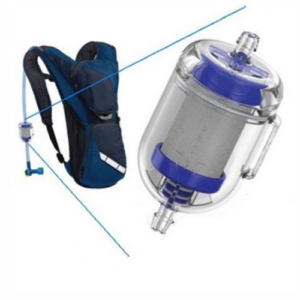
Some like this Nano Gravity Filter (7.5″ x 2.5″) or this Trail Blazer 5.0 L/M 6.5″ as a backup/replacement filter.
Installation Instructions for setting up a RapidPure drip bucket system for water filtration and purification.
Take one 2-gallon pail and drill a 1/2″ hole in the bottom center of the top bucket and another 1/2″ hole through the lid of the bottom bucket. The holes should be directly in line with one another.
This next step may vary depending on the space that must be filled between the bottom bucket’s lid and the top bucket’s bottom surface. Some buckets have a raised rim on the bottom center of each bucket that will leave a gap for the water to leak through. Putting both flat washers between the lid and the bottom of the top bucket may be necessary. This generally fills the gap so dirty water can’t leak through the lid into the clean water bucket.
The filter comes with two 1/2″ flat washers. Assuming your bucket isn’t like the one described above leave one flat washer on the stem of the filter and lower the filter assembly carefully down into the top bucket. As you lower the filter gently align the shaft so it fits through the bucket’s base. If the hole is too tight you can take a pocket knife and lightly scrape the hole to ease the assembly of the shaft.
Take the second 1/2″ flat washer and install it onto the shaft after you assemble the lid of the bottom bucket to the bottom of the top bucket. In other words, the second washer goes on just before the wing nut to provide a seal if water accidentally settles into the lid of the bottom bucket.
Once the lid, filter, and wing nut are fitted together, gently tighten the wing nut to prevent contamination or leakage. Be cautious and do not over-tighten the nut so much it stresses and cracks the filter stem.
Now let’s do a leak test as follows…take a cup of water and pour a thin layer of water into the top bucket but not so much that it begins to run through the filter element. Then take a cup and pour a little water into the lid attached to the bottom of the top bucket. Let the water sit in both places for 20 to 30 minutes and then carefully raise the bucket and inspect for leaks around the wing nut where the shaft goes through the lid. If there is a leak, it needs to be fixed to prevent unfiltered water from entering the bottom bucket where the clean water goes. The fix may be as simple as switching the flat washers to a different position as described above.
Then drill a 3/4″ spigot through the side of the bottom bucket. The hole should be drilled deep into the sidewall of the bucket, but not so far down it makes it impossible to screw the nut onto the spigot shaft. The nut is supposed to go on the inside of the bucket. If the hole is drilled too low in the side of the bucket the nut will interfere with the floor of the bucket. If the hole is too high you won’t be able to get all the water out of the bucket. Using the nut to determine the positioning is best so you’ll know exactly where to put the spigot hole.
The above water purification kit is available for those who don’t have a drill or drill bits. Filter life can be extended if you wrap a small dishcloth around the filter element. Securing the cloth with a string or rubber band is particularly good even when turbid water and contaminants aren’t noticeable.
When you put water into the top bucket it slowly passes through the filtering element and trickles down through the filter shaft into the bottom bucket. If the water flow becomes too slow you may have to rinse the filter or clean the screening cloth.
We recommend you all have at least two or more filters on hand so you have backup to survive a provisional emergency.
Trail Blazer 5.0L 6.5″ replacement filter
Additional information
| Weight | 3.2 lbs |
|---|---|
| Dimensions | 12 × 10 × 12 in |
Reviews (0)
You may also like…
-
Trail Blazer Ultra Light Filter 5.0 L/M 6.5″
Original price was: $49.99.$45.99Current price is: $45.99.
Related products
-
Nano Gravity Water Filter 7.5″ x 2.5″
Original price was: $63.99.$59.99Current price is: $59.99. -
-
-
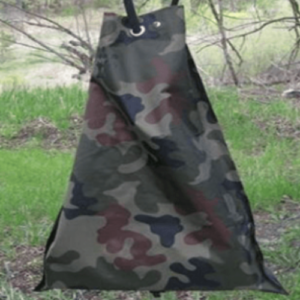
Gravity Feed Water Filter Spring Roll Field Bag
Original price was: $49.95.$39.95Current price is: $39.95.

Recently viewed products
Trail Blazer 5.0 L/M 6.5″ Drip Filtration Kit
$72.48
Reviews
There are no reviews yet.